Friday, December 23, 2011

200 Sales

I can't believe it!  I just hit the 200 Sales mark on Etsy!

When I opened my shop in August 2010, business was SLOW.  I had about 5 shops listed for about $5.  Each shop took me about an hour or more to design.  My first sale was to The Rambling Scholar (here shop is still up and running great) it was a custom design that took me about 3 hours to complete from start to finish and I sold it for $5.  I was so excited someone was willing to pay me for a design I really undersold myself.  In the business world my time would go for over $40 an hour.  It is amazing how unemployment can have you under value your worth.  I didn't sell that many shop sets at first.  I don't think my business really took off until I raised my prices to just $20, and began to use Facebook as a social media tool.  Then I put forth my marketing and graphic design background to work for etsy artisans.  I began using the knowledge that I had used in the professional world to the talented Entrepreneurs like you.  I offered above and beyond customer service while being honest and up front at the same time.

 I bartered with customers for etsy shops.  I would trade craft supplies and lovely handmade items and I was able to have the most wonderful items for myself, children, and family members. Word of mouth has been the biggest blessing to my business.  No matter how hard you try you can't do this by yourself.  You need some help from friends, and other etsy artisans.

I began offering business branding and explaining to my customers how to use those items to promote yourself and your business.  In August 2011 when everything was in Place everything really took off.  I began to value myself and my time, and because I valued my skills and knowledge I think I was able to produce the best work I have ever made.  I want to thank all of my wonderful customers and hope that my testimonial will help someone out there who is in my same boat.  Now I keep thinking...I could be celebrating 500 sales....If I knew then what I know now.  I am still learning...and I am happy to report things just keep getting better...
Again thank you to all of my customers...

Sunday, December 18, 2011

Make your own Sewing Tags.

I saw this cool tutorial online and I had to share it with you.  Freya, and Etsy Artisan walks you step by step on how to make your own Sewing Lables.  Check it out HERE


Saturday, November 19, 2011

Make your own Price TAGS

My son is an athlete.  When he has an all day tournament he loves to drink these power gels from gatoraide.  They are expensive...but I really loved the silver on the back of the box....so I had an idea...

Get my circle punch out and start punching away.  It was a small box and I was able to get over 20 tags from something I was going to put in the recycling bin.

All you need is a punch of your choice...and to raid your recycling bin.  I bet you could make about 100 or more price tags per week....or you can be picky and just get the colors you want.  I just used the silver...


So as you can see my finished tags are silver on one side, and brown create paper on the other side.  This is pretty much a free price or product tag....How often can you get free supplies.  So what do you think?

If you use this idea please let me know....Post a link to a photo...I would love to see it...
  

Saturday, October 15, 2011

Craft Show Ideas......I am speaking as a customer

My daughter and I have started a tradition of going to local craft shows and trying to see what treasures we can find.  It is our girls day....

I never have something I want, or something I am looking for.  I personally look for something that is unique and different that I haven not seen before.  I have had a craft booth before.  My grandmother retired and ran her own quilting business for over 20 years and as a teen, twenty year old, and 30 year old I went to every craft show.  She had great success with her business.  I designed her business cards, ordered handmade personalized sewn on tags, Designed and made signage and sold all of her quilts.  She always priced things way to low....she need me to be there and be the bad guy.   I even made alot of her displays.     As a marketing person I had few suggestions to draw attentions and potential customers to your booth.  I only hope to help and not to criticize.  I am using my observations as a customer.  Please feel free to comment on some ideas you have.  I AM GOING TO RAMBLE..I hope I don't forget anything.  You don't have to spend alot of money to make a wonderful booth.  The more booths the more you will learn what works for you.

1.  SIGNAGE.  There were over 200 hundred vendors at this craft show and maybe 50 had any signage at all.  It is so nice to have some little sign to tell who you are and what you sell.  Some booths Had a few people blocking tables.  I couldn't even see what you were selling?  Signage is soooo easy.  You can make a sign in Microsoft Word using 11x17 layout and then take it to your local office supply store to print and laminate.  It will cost less than $5 for a full color sign....Make your own sign using a try putting it together with scrapbook paper and sticker letters....If you are a quilter....QUILT A SIGN.  If you are a knitter...Wrap yarn around some inexpenisve foam letters...Or try THIS.  Or purchase some wooden letters and a wooden plaque.  You can find many of them at a the dollar store.  And old chalk board can be fun as well.  I know for a fact you can purchase chalkboard paint for $1.69 in the acrylic paint section of your craft store.  I have made a few signs for gifts.
SIGNAGE IS ALSO IMPORTANT FOR...returning customers.  If you have the same booth every year folks will want to find you....OR if they are not ready to purchase from you right now....(example baby on the way but no sure if it is a boy or a girl...)they may see you sign an take a business card...Keep your business cards out on your table.


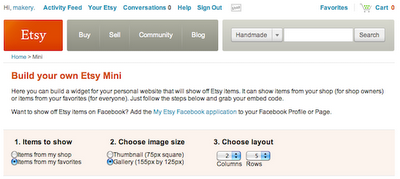
I was just web surfing to find some ideas and The owner of Etta + Billie made her sign with an old sheet and some T-Shirt transfers.  You can't fit all of the words on one page, but look how wonderful.

2.  YOU ITEMS NEED TO BE SEEN FROM A DISTANCE.  I walk and glance as I go.  As I was leaving today I kept thinking.  I wonder if I missed anything?  I didn't see hardly anything I was interested in.  Don't lay all of your items FLAT on a table...Expecting folks to come and dig on your table.  Most folks decide to stop by first glance. I am looking for something to catch my EYE.  If you sell jewelry lay some flat....but prop your best selling pieces up... Here is a great jewelry holder tutorial.  If you can't get a peg board you can use needle point plastic...They come in lots of colors...and they are really cheap.  Or aluminum screening from a home depot Sometimes they come in 12x12 squares.

I saw quite a few knitters and crocheters just toss all of the hats and scarfs on the table.  It was so sloppy and unprofessional.  You worked so hard on those crafts....Don't just toss them on the table.  Put like items in a basket with a tag on the outside...If you don't have a head form to display a hat...Use a doll.  Barter with a photographer to use your hats as props for their clients in exachage for photos...of the clients with our product on display.  (happens all the time.  Place those 8x10 photos behind a basket of hats...)  IT WILL ATTRACT ATTENTION.  My little girl LOVES crochet hats.  Bu...to dig with her at my side...They should be CHEAP....well I decided to pass and just look on etsy.  Check out this display...LOVE IT.  I love the colors.  Doesn't it just grab your attention???
I love this headband display the handbands are on Large PVC/plumbing pipes covered with fabric....you can just stand them up...you don't need to build an acrylic box like this


this would be a great way to display bows...you might even sell this for a cute addion to a little girls room...

 di
I love this simple handmade hat rack.  Weigh the bottom and it will not blow over in wind.


This is a more complex display...but I love the prices at the top and how easy this would be
to maintain....


Look at this...this would be easy to store your products in...and then just hang it to display it

I love this display idea for handmade cards.  I don't think a customer could see them as well if they were flat on a table.

3.  YOUR BOOTH LAYOUT.  I saw a few booths I wanted to look at more.  BUT I had to squeeze into the booth...with my little girl and I felt cramped.  My little girl is very very very good, but.... I didn't like it.  There were several booths like that.  I don't want to enter your little closet...Open your booth up...Make it to where several customers can purchase at the same time.  Don't underestimate moms with strollers...they came to buy and love handmade items..Don't make it where they can't shop.  I know sometimes there are some space constraints but try your best.  Open it up...Use your vertical space.   I love it when folks pull there table back......and put some other tables on the side...Like a Gaint E without the middle line...I hope that makes sense??..Don't box me in.

4.  DECORATE YOUR BOOTH.  A first glance attracts people to your both.  Your booth should welcome customers.  If you use a tablecloth Think about your colors.  It doesn't have to be something expensive.  Your local fabric store sells cheap fabric on clearance.  If you can't sew...Barter with someone who can....OR use a liquid sew to make your make your seams.  If you sell small items...that will fit in the palm of your hand....Use a very plain tablecloth.  If you have a pattern on your tablecloth it can complete with your product.  OR place your small items on a tray....

LOVE THIS ONE..
I made 4 purchases today.  No one asked me to follow them on Facebook.  No one gave me a business card.  No one asked for my name and address...(you can have a drawing for a free item)  I really liked those items I wouldn't have stopped if I didn't....I may want to see something you have in the future.  You need customers....Don't through away opportunities....READ my blog post on QR Codes.
 
You can do everything right and some customers will not stop at your booth.  Don't take it personally.  I don't purchase make-up, and I don't usually purchase food or mixes, I also don't purchase hair bows...I have a hairbow lady already.  I also don't have any babies in the family so I don't stop at baby booths...But sometimes I break the rules.  I purchased a headband today....

Wednesday, September 14, 2011

Recycle your old blog posts.


I saw this article by Michael Hyatt's, Recycling Your Blog Content, recently and I had to share it with you.  I didn't wright this article but I knew it would be helpful.  
Don't let the great posts you've written in the past get buried in all the new stuff you are publishing today!
Recycle old postsPhoto by Mykl Roventine
Old content with a timeless quality about it is often referred to as "evergreen" content. Here are a few ways to get it seen again:

1. Tweet 'em.

As Michael Hyatt recommends, tweet your old posts once a day.

2. Facebook 'em.

Reposting works on Facebook too. Sometimes I've posted older posts on Facebook and labelled them "oldie but goodie" so people know it's not new.

3. Book (or eBook) 'em.

Combine a bunch of your old posts into a PDF or even an ebook. You could give it away for free or you could sell it. A lot of people will pay for the organization of old content.

4. Link 'em.

Link internally of course. Always link to older posts in your new ones whenever possible.

5. Archive 'em.

In my new design I added an Archives page and I've gotten a lot of great feedback from people who say it's been so helpful to see all my older posts at one glance.

Bonus Tips for Recycling Old Content

  • Read through your post quickly before highlighting it to make sure it's up to date.
  • Don't change the permalink (!) but consider freshenin' up the title.
  • I'm a big fan of linking to old posts, but I think the actual re-posting of them should be done very sparingly. By that I mean, I wouldn't recommend copying and pasting an old post into a new one and republishing it as new (not so good for SEO). Just work a link to the old one where you can.
  • Why not make recycling content part of your regular blogging routine? It doesn't take long and has a lot of excellent benefits!
What about you? How do you make sure your older content doesn't get buried?


Thursday, September 8, 2011

YOUR Blog

Designing a new blog is so exciteing for me.  I love to set up a blog for a customer and look back in 3 months and see how far my customer has come.

When I design a blog...I just design how it looks I don't really do much with the content.  BUT without content a pretty blog is not very useful.

Before adding your blog you need to know what it is you want to do with it....
Is it for a hobby
A how to blog
Your life blog
Your etsy business blog
???what.

I have alot of folks who want to set up an etsy shop blog and that is so fun and a great tool for your business.  To have a sucessful blog, post atleast once a week.  You can blog about new listings, the materials you use (this is a great way to show the value of your product...what makes it vintage?, EXAMPLE if you make handmade Llama yarn, take your readers on a field trip to show them the process of your craft...) you can blog about sales, you can blog about your family, you can blog about treasury lists, and craft shows you will be at....This will keep your blog updated EASY....You will want to add extras like a facebook feed, twitter feed, etsy mini, and maybe a gallery of your past work..(I don't have a gallery...instead I use my facebook page. but that is my choice works best for me.....(these extras you will need to intsall...but they are super easy)  

You can laugh at me....I know the rules but look at my posts....LoL.

The people that want to set up a fun craft blog......with galleries, contests, crafter of the month, links of your favorite pages, giveaways and more.  You are ready to go guns blazeing....

BUT YOU NEED TO STOP.....Here is how you set up that type of blog
1.  Have me design your blog....
2.  Set up your social media if you want them
3.  set up your gallery if you want one....In flicker...or smug mug...or a smiliar company.
4....GET STARTED BLOGGING...
Once you start posting projects....people will follow.  when people start following you will have submissions to the gallery, you will then have a group to select crafter of the month, you will then have interest from vendors to do giveaways because you have followers,  You will then have contestants to begin CONTESTS....as time goes and the word gets out...more followers will come..and before you know it you will have your hands full....and your dream of having a successful blog has come true.

It is okay to say....coming soon...And it is okay to fine tune things as you go to find things that work for you.

What do you think????  Did I make any sense???  Do you have any questions???


Thursday, August 25, 2011

Marketing HINTS

Want to get your name out to more potential customers in your community?  As a graphic designer I have been helping some local handmade customers with adds for school directories, PTA school newsletters (only $3-$10), High School football programs($10-$25) and Local school newspapers ($10 a week for business card adds..more

Can you help a sponsor a local sports organization???

Did you you know that Susan G Komen  race for the cure participants have to earn $2,500 per runner.  Races are occurring all over the US in October and April.   Could you sell a product and donate a percentage of the proceeds????  Create a PINK inspired product....Make a donation on your own.....October is breast cancer awareness month.  Get to making your products NOW...

check our your community for more information.  This seems like such a great deal...I know alot of the local schools, and churches will soon begin planning local craft fairs...

And if you find yourself in need of a new logo, banner, business cards, blog or more...Please contact me.

Wednesday, August 24, 2011

Sweet Gracie Mae

I just designed a complete Branding package that includes Blog, Etsy Shop Desgin, and other business elements.  I loved the colors and unique one of a kind logo.

You can find here etsy shop at SWEET GRACIE MAE


Crafting Rebellion Blogger Design

I just designed a new blog for Lisa at Crafting Rebellion.  She was super sweet to work with and I can't wait to see what she posts.  It is going to be a very popular website.  It is a one of a kind desgin...
Want a blog makeover of your own...come see me


Friday, August 12, 2011

GRAB my button Generator

I get this question all of the time and I found a great generator for those who are not comfortable with HTML coding.


You will need to host your image in a web album.

In your blog add a GADGET then choose HTML code and past the code. You will then have a Grab my button generator for you blog... How cool is that...

Add an Etsy Mini

I have posted this before but This gentleman had an easy tutorial about adding an etsy mini and I just had to share. What do you think?

Tuesday, July 12, 2011

Why have a reserved listing Image & how to use it


When designing etsy shop sets I always include a reserved listing photo. I just wanted to take a moment to explain what a reserved listing is and why it is nice to have. The graphic makes a clear statement that this item is reserved, but conveys a consistant and professional image of your business. The size can be 200x600 or square. Etsy takes either. I personally like square logos but either size works. I like to say the item is RESERVED for a special customer. What customer doesn't want to be told they are special. It also shows other potential customers the possibility of what you can do for them...

Here is a blog listing from Etsy about reserved listings.
"Story by CustomerCare, daniellexo, Published on Sept 16, 2008 inSeller Handbook
Dear Sellers,

Wondering how to reserve a listing in your shop for an inquiring buyer? It's easy as pie! Here's how:

1) Edit your item listing by going to Your Account >Currently For Sale > Edit

2) Click the edit icon (pencil) next to your item's title to change the title. Here you want to boldly state that this listing is reserved for your customer. For example, *Reserved for DANIELLEXO only - Diamond Necklace*. Making "reserved" the first word in your listing ensures that buyers can clearly see the item is reserved in the search results, both Gallery and List views.

3) Scroll down and enter this info in the item description as well. (Just in case the title was not sufficiently obvious!)

4) It is optional to use a special graphic or add text to your first photo stating this item is reserved. This is an effective way of visually communicating to buyers that the item is not intended for them!

5) Make sure you complete editing your listing by continuing to Step 5 and clicking "Finish".

And you're done! Now the item is back in your shop and clearly reserved for your customer.

Sunday, June 26, 2011

How to change your blogger background.

A Blog is a personal reflection of who you are and what your blog is about. A blog background can assist you in conveying that message. And it is fun! Here is how you can personalize your blog:

1. Find a color you would like to use. When you find that color....get the hex code.
You can find a list of hex codes and the colors here. Think of it as the digital paint chip.
http://www.december.com/html/spec/color.html If you have the RGB color codes you can use this easy generatior to find the hex code http://www.javascripter.net/faq/rgbtohex.htm

2. Log in to your blog, and Click the DESIGN button in the top left corner of the page.

3. Then in the top left corner click on TEMPLATE DESIGNER.

4. Next you will click on ADVANCED and BACKGROUNDS. Then once you place the color code you desire in OUTER BACKGROUND box. Click on APPLY TO BLOG to save changes. Now that this is done lets add some personallity to our color.

5. Click on BACKGROUND. Then click on patterns or transparant. This will give fun options for your blog and your color choice find what works best for you. With millons of colors in the world your blog background is sure to be unique. Here is the one I choose with my favorite color red...or Dark Red. click on each one to see how it looks in your blog.. Click on DONE when you have found the one you want.
If you follow this HOW to let me know...I want to see your results....How did you like it? Share you blog link in a comment so others can see as well...

Wednesday, June 22, 2011

Going Green

I have a confession. I am a rebel. I tend to avoid or do the opisite of what is expected or requested of me from society. I don't want to do something that is considered popular just for the sake of the popularly. I want to do something becasue in my heart I believe it is the right thing to do.

The approach of "Going Green" seems to me to be a huge media propaganda project for the greater good, and the future blah blah.... I really don't like the emotional blackmail guilt trip to going green as a reason for my participation. (If you don't go green you must not want to give your kids a great future, or you don't like polar bears) This is the point where the rebel in me comes out.....I can't be the only one? Am I? The green movement has been widely commercialized, there is a green alternative to almost everything. Manufactures are putting lables on thier products saying that they are green, but are they really. GRRR

People love celebrities. It seems to be the fad to for celebrities like Lenordo DiCaprio to urge his fans and others to "go green". How can one refuse? He is so cute, he must be right. (I am being so sarcastic) How can someone (Leo) with a larger carbon foot print than mine tell me I need to go green. (he wastes more electricity lighting his tennis courts, then my entire house uses) It seems really funny to me. I think folks would go green and stay green if it was something they really believed in, and not a fad....or the popular thing to do...

I consider my self a very green person but I bet there are some ways I can do a much better job.

I am going to discover ways to reduce my waste without increasing my budget. I hope you sit back and relax and enjoy my journey, and don't be afraid to let me know what you think. I am not wanting to debate to much....be a grown up.

Saturday, June 11, 2011

How to add Etsy Mini to Blogger

Adding your an Etsy Mini to your blog will definitely increase traffic to your Etsy shop. It is alot more effective than just a plain ole' link. There are alot of steps. You can add a mini to the side of your bar or to one of the pages on your blog.   OR FILL AN ENTIRE page buy adding it to one of your tabs on your blog.  Just increase your number of rows and columns.  

Here is how TO:
1. Log in to your Etsy Shop
2. Click on the YOUR ACCOUNT at the top of the Etsy Page. Look on
the left hand side of your page you will see PROMOTE. Choose Etsy Mini.

3. Then choose how many columns and rows....Your choice....It will show you a preview. Then copy the code. (Java script for your personal website and blog.) If you are putting the Mini on the side columns I recommend 2 columns. It doesn't matter how many rows your choice. On a page. Fill that baby up.

Then log on your blog click on Design, then ADD A GADGET.
Choose to add a HTML and paste your code in the box. Add a title of your choice before saving. You can always go back and adjusting collumns and rows to fit your blog.....Or adjust you column width in blogger.


Tuesday, June 7, 2011

How to Add a Signature to your Blog

UPDATED 2/1/2013
One of my most asked questions is how to add a signature to the bottom of your blog. It is super simple. I have seen some REALLY complicated tutorials out there so beware.

1st thing you must do is create your signature and save as a PNG file with a transparent background or use a background that will match your blog. 
-You can use picnick OR image Monkey or any software you have. You can use Publisher and PowerPoint and right click on the image and save it as a png file.
-If you can't figure out how to make one you can always request that I create you one from my etsy store. 
-There are lots of scams out there about Signature creators. Please avoid them. If I find some safe ones I will post them. If you know of any please post below in the comments. I don't like the ones that require you to sign in, or give your email address. That usually means they want to send you lots of spam, and who likes spam. The best thing to do it just find a font you like and type what you want as your signature.

Save that image in an online album. The same album you use for your avatars would be perfect. I have gmail and I use Picassa.


1. Go to the top of you blog and click on SETTINGS
2. You will now scroll down to the title POST TEMPLATE (it has a blue word that says add...when you click it you will get the box) in this box you will post this code 
(img src="http://theURLlocationofyourimage.png") Replace the ( )'s with < >. If you don't this will not work...
Then Save your changes. Now each time you compose a blog posting your signature will be located at the bottom. When you start a new post you will find the signature is already there. SO DON'T DELETE IT.

Thursday, May 26, 2011

Handmade Packaging

Packaging your products doesn't have to be expensive. Just invest a little time and shop for FREE supplies from your recycling bin.

I made 4 pillow boxes from 2 boxes of cereal, left over scrapbook paper, and ribbon. (I didn't purchase anything) This is a great finish to your products and a very inexpensive and eco-friendly way to add that finishing touch to your handmade products.
Materials needed for this Project.
*Boxes
*scissors (not your good Pair)
*scrap 2 x 12 strip of scrapbook paper (you can make 6 strips from one page, Perfect when your scrapbooking stores have paper marked down to 5 for $1)
*Other emblishments that you choose.
*Glue (your choice, elmers, rubber cement or a glue stick)

1. Trace your pattern on the outside of your box, Leave the brown on the inside. I found my pattern HERE. Size your pattern to meet your needs. I cut one of the folded notches out and just fliped it around 4 times to make my notches. You could also print 2 patterns one for the outside and one for the insides. My Boxes are about 4 1/2 x 6

2. Cut out your pattern, and score your folding marks. I scored mine by pressing hard when tracing, and backing my box with a thick cardboard. It really made scoring super easy.

3. Glue down the flap. I set a heavy object on top of it while I traced and trimmed the other boxes.

4. Fold down your edges. I used my 1" circle punch to make the notches at the end but you can just trace and trim those notches if you don't have a circle punch.
All that is left is to decorate. You can make you can make your packaging as fancy or as understated as you want.

Today I counted the boxes in my recycle bin and I have about 7. Some I could make 2 Boxes from some I can make 1. If I owned my own handmade business that would be about 10 FREE boxes a week. A great TIP would be to trim out your boxes and store in a place out of the
way. Be sure to put your left over trimmings back in your recycle bin.

I embellished this box with 2 different types of paper, a tulle flower and paper rose flower. Just to show you can go overboard with your packaging if you wish.
I chose this paper because it matches the box perfectly. I used some thin embroidery floss to wrap the package. I used my 1" circle punch to make a small tag. You could stamp an image or write "thank you" on this tag. It is up to you.


I used a clear label on the package and couldn't see it as well as the label printed on white paper.
But I think the over all appearance matches my blog perfectly. www.vampirecraftin.com

I could have just used cardstock and paper I purchased but I really wanted to make this project for inexpensively as Possible, and as GREEN as possible. I would love to see your pillow boxes if you make this craft I would like to see it. Post a link in a comment or email it to me.

Here are some I saw online that were just tooooo cute.

Thanks...