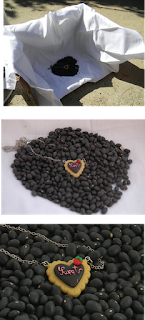
It is my option that if you don't take GREAT product photos then you are missing a key factor in your business. GREAT photos SELL your products. I would love make a post where I show you product photos that are horibble and ask you....Would you buy this? but I can't do that...I don't want to embarrass anyone.
When you take your product photo don't take a straight on shot...prop up your products up. turn them at a slight angle. Move around and find the perfect angle.
1. Make a photo PROP Each of your photo backgrounds and props should be EXACTLY the same. It is part of your SHOP BRANDING. I want to look at your photo and know it is from your shop. It is super easy. You don't need to purchase anything I bet you have everything right in your home. HINT this will set you and your products apart from the competition...This hint will really help you with PINTREST.
Here is one of my fav stores....SEE what I mean her backgrounds are all the same.
http://www.etsy.com/shop/shavingkitsuppplies
See how the box is in front of the well lit window.
 |
| This is my baby's diaper box. I cut the top flaps and one of the sides off |
 |
| see how the beans prop it up Now the first photo is what my photo prop looks like. I took the photo outdoors. The second photo is the acutal photo I took. The 3rd photo is cropped. |
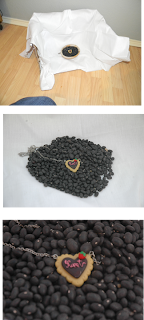
Now the first photo is what my photo prop looks like. I took the inside by the window.
The second photo is the acutal photo I took.
As you see they are both great but the one outside is better.
 |
| Black Beans |
 |
| Popcorn |
Here is a prop idea. Go to the hardware store...Did you know if you just want 1 tile piece or 1 plank of wood....or any other matrial you can just purchase one. You are only limited by your imagination . You can spend less than $10 for something that will last.
Now the last thing you need to do is add your logo....and watermark your images. I didn't bother to do the images above because they are not real. The necklace is made in China I am sure. LOL..
I did not do ANY photo editing. All you need is a decent camera, and a well lit area. If you can use a regular camera over a cell phone then do so. I know it takes a bit more time but you have worked so hard on your handmade product....Do it justice with a better photo. My second piece of advice is to try and use as good of a camera as you can. I used a NIKON COOL PIX L26 camera. I got it on sale for 39.99 on a black friday sale last year. It is a great little camera. It has a CLOSE UP setting that I used on all of these photos... Try not to zoom....Each time you zoom with a point and shoot camera you loose pixels. It is better to take a photo a little farther away and crop.
The second photo ..Same S4 camera. I just took the photo near a window Not in direct sunlight.(JUST LIKE ABOVE)
I didn't use any filters or special tools. I just took a blank sheet of white cardstock and using one of my sons blocks propped the bow up a bit..Take photos of products at an angle is best. Nothing flat looks to good. I set it on a table and moved around until I liked the photo. I Added a photoframe to the back with and watermark to BRAND my photo. (included with your purchase) Be unique. I can't tell you how many folks use old fence panel looking background, but nothing that takes away from your products. Each business is unique. so it depends on what you sale and your logo. If you don't have Photoshop or photo editing software program you can use pick monkey
Before you get started think long and hard about your business....Who you are? Who is your audience and what PROP would elevate your product. Keep it simple...nothing to busy that will take away from your product...And INNOVATE do not DUPLICATE. and I AM HERE IF YOU HAVE ANY QUESTIONS OR NEED ANY ADVICE.


