Sunday, May 24, 2015

FREE bottlecap images, Reduce, Reuse, Recycle

The other day I was spring cleaning when I noticed how pretty the images were.  Maybe it is a graphic designer thing.  It seemed like such a waste to toss away.  Surely I could find use for it.  Summer is coming up and I am always looking for something to entertain my kids with.   I have a bunch of bottle caps and I thought these images would make perfect bottle cap image crafts.  We are going to use them for necklaces and Christmas ornaments and such.  For FUN...  I personally don't sell crafts, any crafts I make are for my kiddos....I hope you enjoy...I was able to make 125 bottlecaps...From this pile of trash....You can use for colleges, cards, and other crafts as well.


Villains


During my cleaning I found a old activity book that was colored in and everything in the books was complete.  I found some wonderful images that could be used.  The were small so perfect for a bottlecap image.  The entire book contained lots of GREAT images.  So not only did it help my daughter with mastering school concepts, but I used it for bottle caps later.  I am sure you have tons of old tattered and torn books that go in the trash....they would be perfect for bottlecap images...Cards and more.


I found adds from my junk mail, with wonderful images.  My son just had a birthday.  We had lots of packaging left from that.  I was so surprised at how many images I was able to save from the trash and put to use in a craft.  The bottlecap images take up very little space.  So Perfect for rainy day crafts.  Or your crafting needs...

I hope you enjoy...

Monday, January 26, 2015

HOW TO create your own Facebook banner, AVATAR, and Advertising files in PicMonkey.

My biggest tip for the handmade business is to be consistent.  Have the same image (your logo) in place on your page for as long as you can.  Please don't change out your logo out for the holidays.  I understand depending on the business that might not be possible.  You may not have the funds to be able to purchase a business branding page from me or any other designer.  But you can easily make your own.  Make it professional and clean.  You banner is a first impression that shows the quailty of work your customer may find in your shop.  Make it unique.  It is not as hard as you think.

1.  Find a photo you love.  Be careful.  Make sure you are not stealing anyone's art.  I would love to see one of your photos...or take one just for the occasion... You can find free clipart online.  Make sure it is really free.  A big mistake folks make is they take clipart from online that are low res and it looks horrible.  So that says to your customers what they will find in your shop is just as horrible.

I have a freebie album on my facebook page of timeline banners you can use.....
https://www.facebook.com/media/set/?set=a.596043697112673.1073741838.168806933169687&type=3

This is what I did in PICMONKEY in just 2 minutes....With stock images....NO membership or upgrade required.  this is clean and professional....

http://www.picmonkey.com/

Choose the DESIGN button then.


Then you just start playing....Use your imagination....I selected the butterfly icon (which is an overlay button) and added a rose to the background and made it HUGE...then ADDED a ribbon and then just typed It was soooo easy....Wouldn't this look so professional with one of your product images below...the ribbon... Or PILE a bunch of supplies I know you have and snap a GREAT photo....


TIP...  You can use the square to make your avatar, or addvertiseing image for your page...be conistant...  Then use the 4X6 to print at your local photo center or on your home computer for bow cards....  It is so easy to add photos from your computer....use your product photos or just take a great photo of a bunch of ribbon, beads and supplies.....

BE UNIQUE...

Here was the free Valentines day banner I have on my page...Here is how to add TEXT....Se it just looks so clean and professional.  The image you pick is key to say this is my business and this is what I sell...so give it some thought.  The format should NOT NOT be centered...When you center you image it is cut off by your profile pic...Center your wording on the right...

Se the Box on the right that is how you change the text color and size,....center your text and much more....


Here is the Square Avatar....See the Box on the right that is how you change the text color and size,....center your text and much more....

Use the Same file to make announcements, Sales or to talk about whatever you want.  Use it to promote your business and more...


I hope this helps....When you are ready for a Business Branding design...Please message me at Vampirecraftin on Facebook...

Saturday, May 31, 2014

How to Watemark or add a photoframe with PICMONKEY

The best free software to edit your business photos with is PICMONKEY I have tried them all and this is the best.  If you want more advanced photoediting it is only like $2-$5 per month.  You can make collages and edit and touch up photos and even make facebook banners....I don't get paid to recommend it...I have tried several and this is the only free one I like...  I did try gimp and it I know lots of people like it...but it is not a safe program for you computer and really opens up the security on your computer...so it is so worth it...

All of my customers receive a watermark and some get photoframes and this is how you add them...
Go to PICMONKEY.  (you don't have to have an accout...just go right to EDIT...OR DESIGN at the top...or try the royal package for free ...it has tons of tools for free...then after the trail they go away...)
1.  Open your file....Your photo....


2.  Once your photo is open you will want to click on the butterfly....(if you are using the watermark I made for you this is where you search your computer and select the file and OVERLY it on the photo.  You will need to move it around to where you want it and even resize it.  Then you are done...so easy...same process for the frame...or do both...

That is it took me less than a min.  Then just save to your computer your finished design...

Wednesday, December 18, 2013

DIY your marketing material...

I hope you had a great 2013 business cycle.  If so it would be an awesome idea to send out Thank you Post cards to all of your customers.  ALONG with a coupon for them to return in 2014 to shop with you.  DON'T send a email or a PM...SEND a real note.  THIS ALSO WORKS FOR YOU FOR BOWCARDS...

If I have designed your logo you have all of the tools you need...If you are a bow business and I have designed a PDF of your bow cards.  then that is what you use...

If you didn't add on that card...then you need to make your own with the logo I made for you...
You can find free tools online to assist you...I personally use photoshop..

Avery has EASY online templates (cards, labels anything you need) anyone can use you can find them here...
http://www.avery.com/avery/en_us/Templates-%26-Software/Software/Avery-Design--Print-Online.htm?int_id=templatesandsoftware-adpo

1.  Choose postcard template...8387 choose the one you want Horizontal or Vertical..

2.  Next choose which style you want...if I have created a logo for you choose blank...or choose something fun...it is up to you...You can add text but only choose what they have..

3.  Now make your design...you will find all of the tools on the left hand side of the page...

4. When you are finished...click print on the top right hand side of the page it is green...It will set it up so it is spaced evenly.  and ready to print...
Print it at home or take your Pdf to OfficeMax, staples or any other office supply store.  You can email the file to the for the best quality.  It is about .14 cents a copy to print on your choice of cardsotck....Or if you want to print in color it can cost $.49-$1.29 per copy but you have 4 per page.

It is super super easy..you can make anything this way...lables...gift certificates and more....and NO you don't have to purchase the paper...but if you wanted to you could...

IF YOU HAVE MICROSOFT WORD YOU CAN USE MICROSOFT TEMPLATES..
http://office.microsoft.com/en-us/templates/word-templates-FX102825522.aspx
but you can also go to word and you have to the tools to make everything at your fingertips

Just open Microsoft word....OR ANY OFFICE software and click on FILE....NEW....and you will see all of the templates...to make bow cards or thank you cards....Just Use post cards...

To compose your thank you note thank them for their business, let them know what you have in 2014 (photos are awesome), then offer an incentive to return (a discount with expiration date so the don't forget).


Monday, October 28, 2013

Happy Halloween Advertising

I love Halloween.  BIG SURPRISE I KNOW...

If you cater your handmade business toward children this is a great time of year to drop a business card in those Halloween treat bags to reach out to some new local customers.  Make sure you have some sort of contest...OR incentive for moms and dads to come to your store site, or Facebook page. Keep your wording clear and not to busy.  Don't make it ADVERTISING that is cold...Make it a note or something personal from one mom to another.

Here is my ramble of ideas...I hope it makes sense....

Pack a small bag of candy and drop your business card in. (make sure each piece is wrapped and safe)  If you are out with your kids....ask a friend who doesn't have kids if they wouldn't mind helping you out.  They will be grateful to not have to purchase candy....or half the price with you.  If you live in a neighborhood where you don't get very may trick or treaters...you can always volunteer for a trunk or treat event...they are always looking for more people to join.  Check your community...local elementary school, church, community center???? .  

IF you don't have a business card OR if you don't want to waste yours......I have some suggestions. It is going to be a little work on your part but you can do it....

I would go with either a post card size which fits perfectly in a small sandwich bag.  OR a business card size design.  Here or some tips on how to make some quick advertising.  

1.  Try not to spend to much money on this. The return maybe low....You can save money.  Don't print in Color...Take to a local copy center and print on bright colors.  You can bring your file on a disk as a PDF file and get a clean image.  Each copy is about 10 cents...and you get 4 images on a page...that is not bad....If you print at home....try not to put to much color..1 great photo of what you sell is AWESOME. 

2.  IF YOU WANT....partner with a AVON, SCENTSY, or other business...You can print in full color on one side....they can print in color on the other....and split the cost...

3.  I am busy this week to make designs but you can DIY...

Here are some fun Halloween designs...click the link below to play around with how easy it is...AND FREE..Just add your information and print out.  http://www.avery.com/avery/en_us/Templates-%26-Software/Avery-Design-%26-Print-Online-Halloween-Templates.htm  


These will eat up some ink...but they are cute...select the design you want....then choose if you want post cards....template 8577 or business card size and avery will automaticlly set it up for you...like this one below

Then just type your info....

then in the top left...PRINT This ..you can prit to a PDF file and save it for later or to print whenever you want it....or take it to a local copy center

This is how you make bow cards as well Bow Cards as well...Just print VERTICAL post cards...but same instructions.  


4.  FOR POSTCARD SIZE with your own logo go HERE type product 8577  even if you don't have the avery paper choose it anyway..

It is super easy to customize just look on the left side...

This works for ANYTHING you need for your business.  Just think about how and where you are going to print it.  You may have to cut and trim images from a sheet of paper...It saves money but it is a pain.  You can purchase the avery paper but it will cost more.


5. Print 4x6 photo image colleges with your photos....take to your local photo center to make little advertisements for your business.  Pretty inexpensive...but it could really make an inpact. 

6.  If you have word microsoft has fun and easy templates that you can use as well.  here is a link to them.  http://office.microsoft.com/en-us/templates/word-templates-FX102825522.aspx

Whatever you decide to do...make some sort of incentive for folks to come see you.  Make sure you get the to follow you on Facebook.  Have a sale or a giveaway.  The wording depends on your business and what you have to sell.  

Here is a quick idea.  Take a photo of your KID in your best products and ...OR take a photo of a product you will give away....

My Mommy Sells Handmade Hair-bows and fun accessories in all sizes.  Like us on facebook, and ???????? get 25% off ??? enter to win a free????  After X# of Likes I will give away...

I rambled...but I hope this makes sense.  


Thursday, January 24, 2013

Watermarking Your Photos

UPDATED August 2013
There is a chance when you publish your images online that your images will be stolen, or used without your permission.  Don't think because you are not a published professional your images don't deserve the same protection.  When images are taken from your small business, or personal blog it is a huge violation of your rights.  It will also ruin your day.  One simple way to protect yourself is to watermark your photos.  It depends on your logo..but you don't need a traditional "watermark" for your image.  Meaning it doesn't need to be see through unless it your particular logo doesn't work unless it is.  There are no rules.  JUST PROTECT YOUR PHOTO.

When most folks think watermark they think the need this super special graphic image for their photos, and that is a huge process.  But it is not.  It can be as simple as just typing your website or name on your photographs.  I just used Photoshop and added text to my image.  It was easy.  I have to crop my image anyway so it was no big deal.
This is my submission to an online Design Team for Scrapbooking.
This is my little girl if someone took this image and passed it off as theirs I would be PISSED.  
There are a few FREE online places that you can use to watermark your image.  Here are two.

http://www.watermark.ws/  super easy.  You might want to have an account don't worry about going pro unless it is something you really need.


http:/picmarkr.com/  also super easy.  Works well with your Flicker account.  You can add an image or a text to your image.  You can also do multiple photos at once.  Perfect if you are doing old photos from your album.  It also allows you to do tiled text, which mean the entire photo is covered in your watermark or copywright.

Also you THERE is an app for that.  Whatever phone you have there is an app you can use to take photos and add a watermark...I have a Android phone and I downloaded "Add A Watermark" they have a free verison that just adds text....and a app for $1.99 that you can add your own watermark...It is awesome and super easy to use.  ( I get nothing for saying so..)
here is the results...


Next, is if I have designed a logo for you use that on your photo as a watermark.  Just place or insert your logo on top of your product photo.  this was super easy...but there are tons of apps...and software programs...
Here is an old logo of mine on one of my crafts.  

Here is an old logo of mine on one of my crafts.
I have change d the opacity of my logo to 70%

THE BEST ADVICE!!
To watermark your photos with a more permanent and easy solution I recommend investing in a photo-editing software program called Photoshop elements.  It is just like the professional photoshop I use but so much easier to use.  There are tons of FREEBIES on line for you to download for future projects, and it has a watermark button function. HERE IS A HOW TO

It is $99 for a new version 11 but I know lots of folks who just purchase older unopened verisons.  Ebay is the best place.  Just search photoshop elements.  I have had about 20 customers follow my advice...and so far everyone is happy.  You can find an older unopened box for $99 cents - $20.  Make sure you look at the seller and see if there are any complaints.  You can find some on AMAZON as well.  Here is one..  It is not as cheap...but...

I used a version 3.0 for many years until I earned enough money to purchase photoshop about 2 years ago.  Any version is great.  The newer ones have the fun tools.

You can download a free trial...just google photoshop elements to check it out.  And if you need any help once you get it uploaded...just ask and I will be happy to help.

There are free photoediting software but they are not as easy as having one of your own.
Here are two
http://www.picmonkey.com/ (I like this one the best)
http://www.gimp.org/

Any digital camera you have purchased, or printer has free software you can use...it isn't the best but it is better than..nothing..

QUICK TIP:  Save your images no higher than 150dpi.  There is no need to do any higher for the internet.  It makes it so much harder to alter your images, and pass as theirs   Anything below 150 dpi is just for looking.  Keep it on your desktop for your records as a higher file. This is how I protect my graphics.  The look great on your screen but when you try to save them and alter them on your desktop....IT DOESN'T WORK...  HaHa... Here is my etsy shop.  It is a little fuzzy, but worth it to protect my hard work....  http://www.etsy.com/shop/VampireCraftin


Saturday, November 10, 2012

CREATE a product photo prop

You have worked really hard on your handmade items, you have paid for a professional logo (if you don't you should contact me), and now it is time to sell it.  So you take your product photo and you wait for the sales to roll in.

It is my option that if you don't take GREAT product photos then you are missing a key factor in your business.  GREAT photos SELL your products.  I would love make a post where I show you product photos that are horibble and ask you....Would you buy this?  but I can't do that...I don't want to embarrass anyone.

When you take your product photo don't take a straight on shot...prop up your products up.  turn them at a slight angle.  Move around and find the perfect angle.

1.  Make a photo PROP  Each of your photo backgrounds and props should be EXACTLY the same.  It is part of your SHOP BRANDING.  I want to look at your photo and know it is from your shop.  It is super easy.  You don't need to purchase anything I bet you have everything right in your home.  HINT this will set you and your products apart from the competition...This hint will really help you with PINTREST.  

Here is one of my fav stores....SEE what I mean her backgrounds are all the same.
http://www.etsy.com/shop/shavingkitsuppplies


See how the box is in front of the well lit window.  


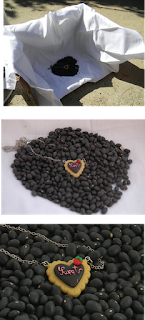
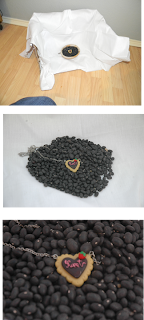
                               This is my baby's diaper box.  I cut the top flaps and one of the sides off


see how the beans prop it up

Now the first photo is what my photo prop looks like.  I took the photo outdoors.
The second photo is the acutal photo I took.
The 3rd photo is cropped.


Now the first photo is what my photo prop looks like.  I took the inside by the window.  
The second photo is the acutal photo I took.  
The 3rd photo is cropped.


As you see they are both great but the one outside is better.

Black Beans


                                   Popcorn

You can also make a bean bag to use to prop up your images...but any loose matrieal would work great here are some ideas.  popcorn, pasta, beans of any kind, rocks (fish tank rocks would be neat), beads, those plant marbles, feathers, Spanish moss,.....you will have to come up with the rest....

Here is a prop idea.  Go to the hardware store...Did you know if you just want 1 tile piece or 1 plank of wood....or any other matrial you can just purchase one.  You are only limited by your imagination .  You can spend less than $10 for something that will last.
here is a tile and old fence plank


 Here is the image of the necklace on the fence plank.
I propped the plank up by putting a  bottle cap underneath the plank


Here is the necklace propped on the sided of the plank


Here is another idea perfect if you want to use different backgrounds to celebrate the holidays but you still want to be NOTICED...I used a frame I purchased from Micheal's $1 bins.  It is about 2x3.  Then I cut a piece of scrap fabric out  and used it as a textrue for the frame background.  I propped the frame up slightly with a bottle cap.  and then just used some scrapbook paper I liked and had on hand.  This is not my fav...but It works for those who like to change things up.  Just keep your frame the same...


Now the last thing you need to do is add your logo....and watermark your images.  I didn't bother to do the images above because they are not real.  The necklace is made in China I am sure.  LOL..
I did not do ANY photo editing.  All you need is a decent camera, and a well lit area.  If you can use a regular camera over a cell phone then do so.  I know it takes a bit more time but you have worked so hard on your handmade product....Do it justice with a better photo.  My second piece of advice is to try and use as good of a camera as you can.  I used a NIKON COOL PIX L26 camera.  I got it on sale for 39.99 on a black friday sale last year.  It is a great little camera.  It has a CLOSE UP setting that I used on all of these photos... Try not to zoom....Each time you zoom with a point and shoot camera you loose pixels.  It is better to take a photo a little farther away and crop.


Here is a before and after of a hairbow my daughter has. I took the photo with my Samsung S4 phone it is a high res file. This is what alot of product photos look it is not bad.  My floor isn't the best background for this design...it reflected the light of my camera flash.

The second photo ..Same S4 camera.  I just took the photo near a window Not in direct sunlight.(JUST LIKE ABOVE)
I didn't use any filters or special tools.  I just took a blank sheet of white cardstock and using one of my sons blocks propped the bow up a bit..Take photos of products at an angle is best.  Nothing flat looks to good.  I set it on a table and moved around until I liked the photo.  I Added a photoframe to the back with and watermark to BRAND  my photo.  (included with your purchase) Be unique.  I can't tell you how many folks use old fence panel looking background, but nothing that takes away from your products.  Each business is unique.  so it depends on what you sale and your logo.  If you don't have Photoshop or photo editing software program you can use pick monkey

Before you get started think long and hard about your business....Who you are? Who is your audience and what PROP would elevate your product.  Keep it simple...nothing to busy that will take away from your product...And INNOVATE do not DUPLICATE.  and I AM HERE IF YOU HAVE ANY QUESTIONS OR NEED ANY ADVICE.