Wednesday, October 3, 2012

Blog TIP.....

I was blog hopping this morning completely annoyed at folks who are not setting the widths on there blogs...It is driving me CRAZY....so here is my post to help...


I have been designing blogs for quite sometime.  There are lots of fabulous folks out there who do the same but they make things so complicated   My goals is to HELP YOU, make your blog fabulous   The reason is it is much less of a headache if you can do it for yourself.  One of the most common mistakes I see on blogs is soooo easy to fix.  When I see blog buttons on your side bars and images on your side bars that are hanging of your mat   I would attach examples but I don't want to embarrass anyone.  This is done by adjusting the width of those columns or sidebars.  Log on to your blog ....look on your side bar


Click on Templates


Then click on Adjust Widths.  
You can move the left side bar, and right side bar.  I suggest 250 this will fix all buttons. 
I also recommend a width of at least 950-1000 pixels wide.

Happy blogging.
Here is a note.  You header needs to be about 20 pixels less than the width of your blog.


Wednesday, August 29, 2012

How to Add Custom Social Media Buttons to Your Blogger


When I design blogs for customers I always include social media icons.  One of the most important elements to include on any website is a set of branded social media icons.  I think the icons work best when posted on your page near the top or as close as you can get.


1.  The first step is to find social media icons you like or create your own...FOR my customers I have already created them for you.  Here are some neat sites to find icons...
http://webdesignledger.com/freebies/the-best-social-media-icons-all-in-one-place
http://icondock.com/free/vector-social-media-icons
http://www.hongkiat.com/blog/free-social-media-icon-sets-best-of/

2.  Upload your files to a site like Photobucket, flicker, gmail photos or your WordPress media library.  Whatever you have will do

3.  Locate the image URLs of your new icons before advancing to the next step. You’ll need to include the URLs for each social media icon you plan to add to your site.

4.  Now it is time to write the button code.  Log on to blogger....Go to your LAYOUT page.  and on the side bar add a HTML gadet and write the following code.

Now just repeat over and over in your code box for each button your have.  If your media buttons are weird sizes...you can resize by addeing the following wording after the (") marks and before the / in the above code. (see how it is toward the end....  I think the icons shoud be set at 50x50.  It keeps your icons in a neat little line...but you decide...check out mine at the top of my page on the left side.


......"width="50" height="50".....

This same HOW to works for ANY image you uwant to add to your blog....


Wednesday, June 27, 2012

HOW TO Change your Blog Background


In order to make a fangtastic blog you will need to do just a few simple things…A Great start would be your background.  Here is where to start:  You need to either upload an image or use or customize one of the backgrounds that blogger has for you...

Here is how to upload an image.
If I have designed an image for you then just upload that image...
You can find backgrounds online but be careful there are lots of scams out there....

1.   Log on to your blogger account
2.   Pick a template.  I really like the simple banner with a book background…. When you set up your tabs and pages it has the most features and looks the most like a PROFESSIONAL WEBSITE and everything is set up easy for your user to find.  

Go to Template…Then click on Customize.  
This is the screen you will now see....Click on Background...and then click on the actual image that appears.....(see the white arrow) Then you will see yet another window POP up.

Here is the screen you will see...
To upload an image Click on the UPLOAD button....and choose a image from your desktop...Don't forget to click DONE and Save the changes...It is that easy..


Here is how to Customize a blogger background.
1.   Log on to your blogger account
2.   Pick a template.  I really like the simple banner with a book background…. When you set up your tabs and pages it has the most features and looks the most like a PROFESSIONAL WEBSITE and everything is set up easy for your user to find.  

Go to Template…Then click on Customize.  Choose a template any one will do but I love the simple template...with the book background.  but choose the one you like. 


After you have selected your template you will want to get started on your background customization...
Click on ADVANCED...then BACKGROUNDS and then set the color for your outer background color...you can also change the section in the middle of the blog...and the other is for your header...
Not sure what color... HERE is a link to a color picker...it allows you to upload an image so you can get a color to match your any of your other blog elements.

Now Click on background....and this is the screen you will see... 


Scroll threw all the preset backgrounds and choose one that may work for your blog OR click on PATTERNS....There are about 9 different ones if you scroll to the last few options...and it uses the color you have already preset in the previous steps...
That is it....don't forget to SAVE all Changes and always apply changes to the blog that you make...that is the most common mistake...SAVE SAVE SAVE

I hope you enjoy this HOW TO...If you use it please post a comment below....and a link to your blog...I would love to see it.  If you need some professional help please see my ETSY SHOP...

Saturday, May 26, 2012

Crystal's Creations

I was so excited when Crystal with Crystal's Creations purchased one of my favorite one of a kind bridal shops.  I love the classy but simple look that is perfect for any business.
I love some of her creations here are a few.
http://www.etsy.com/listing/91811949/formal-clutch-purse-flower-of-spring

http://www.etsy.com/listing/86305868/sparkling-flower-brooch


Made by Mightymom

I have been MIA on my blog and in my etsy shop for a few weeks.  I just welcomed my new baby boy, and I am trying to get back into the swing of things.

I was contacted by Sarah who was refered by another customer to design a new logo for her shop.  Made by Mightymom.  I had so much fun with this design.  She ordered a complete branding package complete with etsy shop set, business cards, facebook timeline, twitter background and icon, and a matching blogger.
CHECK out her blog HERE..


Thursday, March 29, 2012

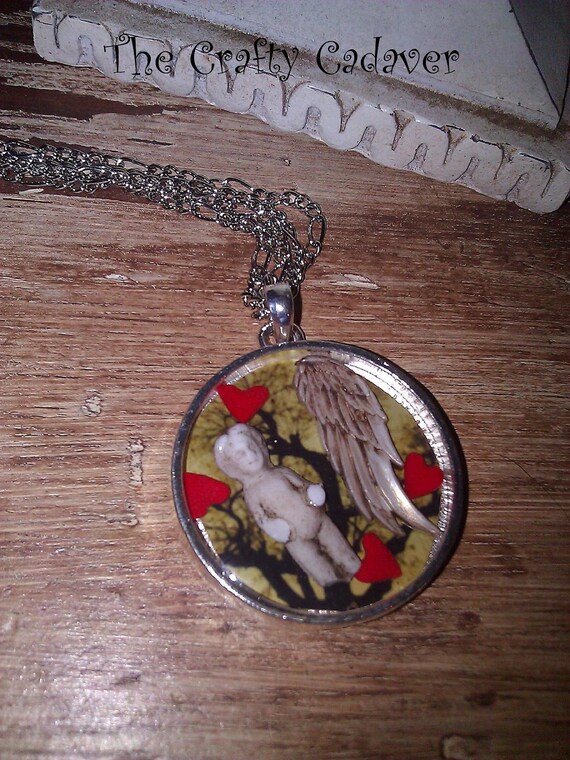
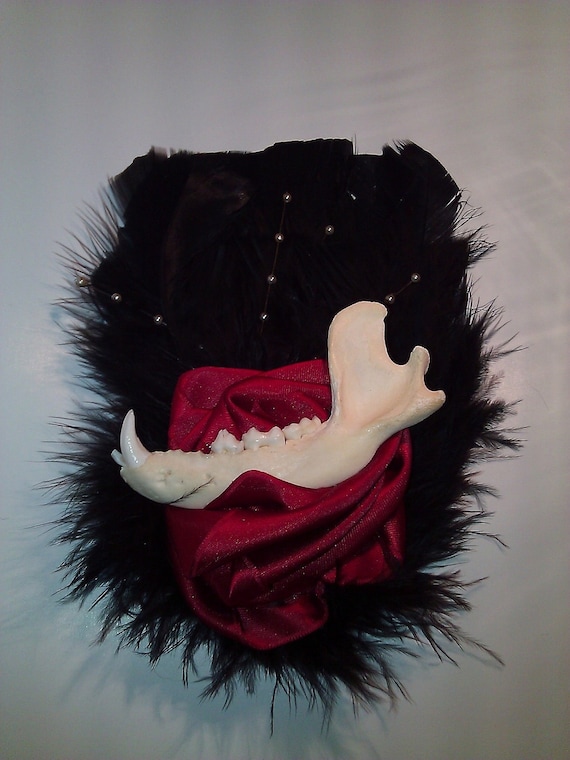
The Crafty Cadaver


I just had the pleasure of Designing a logo and etsy design for The Crafty Cadaver here shop and style is just as wicked as my own and it was pleasure working with her.

Her Profile states.  "I am a stay at home Mom to my precious Isabella.. I also have six other children. Yep, I have SEVEN children... So you can't scare me LOL! My husband and I love assemblage art, unusual jewelry and just the whole creative process. I am also the owner of KinseyBells Bow-tique where I create adorable hair bows and such for little girls. I opened this second store to share my darker side ;) I hope that you enjoy Mine and my Husbands creations. It really has become a passion to us upcycling junk into art and bringing life back to the dead."

Check out her listings.

http://www.etsy.com/listing/93735643/1860-antique-frozen-charlotte-resin

http://www.etsy.com/listing/93254924/ooak-death-glam-real-jaw-bone-feather


Monday, March 5, 2012

How to Make your blog posts "Pinable" on pinterest.


As if my plate were not full enough I am now completely addicted to Pinterest.  On my personal blog (www.vampirecraftin.com) I post lots of fun crafts and how to's.  One way to generate traffic to my blog is to offer folks who enjoy my craft or tutorial to PIN IT, or bookmark it.  This is an easy one step way to get your products or blog posts noticed.  Yes they can also share it on facebook, and twitter...but it is not that hard to add a pin as well...It also has a number counter or PIN COUNT...how neat is that?

Now how do you do it?
Go to the link below and scroll down to "pin it" for websites
http://pinterest.com/about/goodies/
You will see a window that looks like this...

1.  The url is the link to your ARTICLE.....So not only do you want to link the website but the article as well...Click on the subject or the title an it will give you a specific link.  (it is so annoying when ME as a pinterest follower to have to read the entire blog to find the pin...most of the time I just give up)
Here is a sample of a post I have done before...
http://vcgraphicdesigns.blogspot.com/2011/06/how-to-add-signature-to-your-blog.html

2.  URL image is an image you want to link from the blog post....
Example....Click on an image you used and then right click on it and copy image URL...
I have attached a sample...


Once you have that code click the image icon on your blog and paste the image link url in Pintrest window
and then TADA

You will receive a code and just copy and paste that at the end of your posts....But be sure to click on the upper left hand window of your post and HIT HTML instead of compose.....This is a great incentive to use your blog.  This is a way to post all of your new products and you will get lots of help spreading the word.  Don't forget to watermark or label your photos.  

***note.  If every time you post a new Article or etsy listing your make a habit posting about it on your blog, then ad a pin...then from your etsy shop you share on facebook and twitter.  There is not reason why you will not be successful.  Make it a habit...If you log on to pinterest with facebook and twitter it allows you or your pinners to share your post on all or any of the others....Just a few clicks and enter.  How cool is that.  

Pin It

.