
UPDATED 6/2012
I think the blog header is the most important element of a blog. It says this is who and I am and what my blog is about. It draws your readers in.

I think the blog header is the most important element of a blog. It says this is who and I am and what my blog is about. It draws your readers in.
My general rule about a blog header is DON'T put to much information on your banner. It should look more like a bumper sticker than an advertisement.
In my opinion the best banner option is with the Simple Template...(the one that looks like a bookcase.. The other templates can only look great when you are an advanced technical person. This is just my personal option. You can always change your layout later. I Recommend a JPG or PNG file
In order to make a fangtastic blog Header you will need to:
1. Log on to your blogger account
2. Set up the width of your blog...I recommend a width of 1000. but do what you want...your banner must be 20 pixels less than your blog width. This is where you set the margins on the side banners as well. I recommend no less than 200. THEN CLICK THE ORANGE BUTTON IN THE TOP RIGHT CORNER...THAT SAYS APPLY TO BLOG.. (DO NOT FORGET TO SAVE) Then click on the back to blogger link in that same corner.

You can change your sheet width by going under DESIGN, on the top right of your blog. Then click on TEMPLATE DESIGNER. Select a template if you haven't already...I recommend the The Simple Template The one that has a book background...
You will then click on ADJUST WIDTHS. most buttons range between 150 px by 150px and no larger than 250 px. Knowing your widths from the beginning of your set up allows you to place all of your tools and widgets accordingly. You can always adjust when you need to to accommodate anything you need anytime you need. If you set up a 1000 pixel width blog you will need a 980pixel banner...Set the height as you want...I thing anything over 300 is way to big...it is hard to see the blog on an ipad...or kindle fire...

You will then see this screen. Click on EDIT

To configure your header this is the screen that will POP up...fill everything in completely.
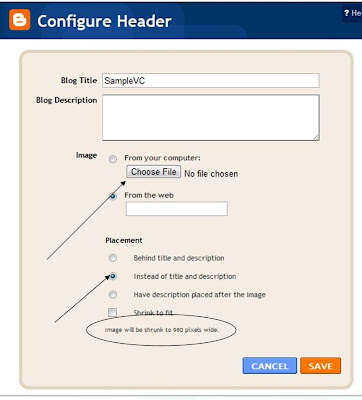
- Blog Title: Your blog title. This will apear in the tabs at the top of the page when someone is visiting your blog
- Blog Description.....You know....what is your blog about
- Now choose your blog from your computer. If you notice at the bottom I circled a size. Blogger automaticlly tells you what size your header should be to fill the page. How helpful. Then click INSTEAD OF TITLE AND DESCRIPTION
- FROM WEB is when you use a free blogger from a site and just add the words to your blog....if you do this then you will click on the button behind title and description. There are lots of great sites for this. Shabby Blogs is the most Popular. The Cutest blog on the block works as well. I have never used either one so read that information before making any changes to your blog.
- Shrink to fit is used when your blog header doesn't really fit and you want to make it fit. I tested this out hopeing it would be helpful. It is not helpful. If you just need a little nudge no problem, but if your image is way to larger then this button will distort your banner.
I hope you found this HOW TO helpful. Please comment below if this helped you. I would love for you to follow my blog. I will be posting a HOW TO once a week, so you never know what is around the corner.
To create a banner I only charge about $5-$10, and I include a matching background and blog button... This can save you lots of time and headache. If you want to create a banner on your own it is a must to have a photo-editing software. I recommend Adobe Photoshop Elements. It is a great investment for your business.
But there are some free ones out there..
Thanks so much for the tutorial - I'll be putting my header up now :-) - PS I LOVE Picnik.com :-)
ReplyDelete